
How to compile & install Magic Lantern (2023 Working 100% minus 1%)
This is an instruction of how to compile &/or install Magic Lantern for your Canon EOS DSLR & Mirrorless camera (except PowerShot & EOS with PowerShot firmwares).
Also featuring QEMU compilation instruction Working 2023 100% minus 1%.
Some URL syntax below uses Markdown format (example_link) which is the ones without 🔗 (External link) symbols next to it & won’t open in new tab! Be sure to always use Middle Click the URL without External Link Symbols if you like to make sure staying here.
Build Compile:
Notes
You must use exactly Debian 11, Bullseye, in which this stable release has GCC & G++ 10 series which are compatible with the ML Simplified source code we will be using.
Using Windows Subsystem for Linux
Windows Only
Only for Windows
This feature is only available for Windows atleast 10 & up
Download Debian WSL here.
Once installed, simply launch Debian app & configure your Debian WSL for the 1st time. Make sure you remember your username & password for this WSL.
Using virtual Machine / Container
Download the latest stable build of Debian, here
You only need the very top Netinst ISO file.
Make sure you also provided the virtual machine / container sufficient amount of specifications, e.g.:
- 3 Cores
- 2048 MB / 2 GB RAM
- 1020 x 720 display
- 20 GB reserved virtual disk space, we recommend using Dynamic Allocation
add / mount the Debian Netinst ISO you’ve just downloaded & boot from it. Follow instructions on the virtual screen. Don’t forget to make your main user an admin / sudoers. Make sure you remember your username & all passwords (both main user & root) for this virtual machine / container
Download the virtual machine / container image
- VHD OVA. https://archive.org/details/debian-bullseye-ml . username =
magiclantern, pass =magiclantern.
Tips: Please go to Recompilation section below to clean up the compilation first for the best result.
ERROR: USERNAME is not in the sudoers file. This incident will be reported.
If somehow that after installation your main user did not exist in the sudoers group, you can do the following to fix this problem:
- Reboot to Recovery!
- When you started your container, you will first encounter
GRUBor described as a selection inside a rectangle with countdown at the bottom. - Immediately press arrow key to interupt the countdown.
- select
Advanced Options for Debian.Enter. - Pick the most recent Linux kernel version (usually on the top), and PICK ONLY the ones with
(recovery mode)next to it. - Why recovery you ask? We assume since your user account failed to exist in the sudoers then any root command (including
su -orsu root) may go completely out of function. - We use this way for the best result possible.
- When you started your container, you will first encounter
- Wait until a blue screen with gray selection box appears.
- Pick
root console. type your root password if asked. - Make sure sudo is installed by trying to install
sudo.apt-get install sudo -y- If the result contains
sudo is already up to date, and does not contain fatal errors, that mean you already havesudoinstalled yey!
- add your main user to
sudogroup by typing:adduser username sudo- the
usernameis your username, replace that with your username. - e.g. say if your username is
godette, you then instead typeadduser godette sudoetc. - alternatively, you can use
usermodcommand, so likeusermod -aG sudo YOUR_USERNAME
- Just in case, set the correct permission in the sudoers configuration file:
chmod 0440 /etc/sudoers- usually, this file should already has proper permission as you installed Debian today.
- unless you screwed up something including this, feel free to re-correct the permission once again just to be sure.
- exit the root console by typing
exit,Enter, and reboot the virtual machine / container. - Once you’ve came back to regular desktop, test your
sudofirst.- e.g.
sudo echo ahei dasandimian - You should be able to see
ahei dasandimianno problem if you followed this section instruction properly.
- e.g.
Further informations: https://www.linuxuprising.com/2019/09/fix-username-is-not-in-sudoers-file.html https://unix.stackexchange.com/a/258865/390514
Use Source Code Edition of
names_are_hard’s Magic Lantern Simplified. Here GitHub repository
the QEMU (simulates Canon firmware) will be on a separate repository of This GitHub repository
Needed Package
You will need the following package, as we have collected, tested, & guessed the equivalent from various instructions:
gitIMPORTANTmercurialoptional since our ML source code edition do not usehgbuild-essentialIMPORTANTmakegccgcc-arm-none-eabipython3-docutilspython2bisonflexzipunzipzlib1g-devlibgtkautoconflibtoollibsdl-consolelibgtk2.0-devmtoolslibsdl-console-devperlused for CHDK ROM dissasembly script. more info here- etc.
Therefore, pls do these commands bellow:
sudo apt update # to update repository cache
sudo apt upgrade -y # to upgrade all installed packaged, always confirm
# and these packages finally:
sudo apt install git build-essential make cmake gcc g++ gcc-arm-none-eabi zlib1g-dev libglib2.0 autoconf libtool libsdl-console flex bison libgtk2.0-dev mtools libsdl-console-dev install make gcc gcc-arm-none-eabi mercurial gcc-mingw-w64 python3-docutils zip perl
or use synaptic for graphical package management experience.
Simply search by those package names above, mark them for installation, & apply.
Steps:
Setup
clone these two. It is also recommended to clone them in a dedicated folder.
# (RECOMMENDED) make a special folder & go inside it
cd # or `cd ~`
mkdir -p sauce/simplified
cd sauce/simplified
# This to ensure you have tidy working space & clean home folder.

# Clone Magic Lantern Simplified
git clone https://github.com/reticulatedpines/magiclantern_simplified

# Clone the `qemu-eos`
git clone https://github.com/reticulatedpines/qemu-eos
Compilation
Magic Lantern itself
# Use the same special folder with instruction above or whereever `magiclantern_simplified` clone folder is
cd ~/sauce/simplified

# go to your Magic Lantern Simplified folder
cd magiclantern_simplified

# Go to which camera model you would like to compile for
# let's say you have 200D firmware v1.01, so go to 200D.101 platform folder!
cd platform/200D.101

# (OPTIONAL) you may need to update the documentations files
make docq
# PLS HELP: still failed

# then just make zip to compile & zip the ML package
make zip
You should see a zip file with names like this:
magiclantern-Nightly.YYYYMMMDD.MODELVERSION.zip
so say you have just compiled 200D firmware version 1.01 at certain date, so the file will looks like:
magiclantern-Nightly.2022Nov19.200D101.zip
Furthermore
It is possible to compile & zip every single version exist in this ML repository.
simply make zip in the root ML Simplified directory, without going to which platform folder.
cd ~/sauce/simplified/magiclantern_simplified
make zip
and as usual, the zip files will be on each platform folder.
QEMU EOS
Further informations:
https://github.com/reticulatedpines/qemu-eos/tree/qemu-eos-v4.2.1/magiclantern
# Use the same special folder with instruction above or whereever `magiclantern_simplified` clone folder is
cd ~/sauce/simplified

# Make sure you have cloned `magiclantern_simplified` before,
# instruction above section

# Go inside `qemu-eos` you've just cloned, switch branch to v4.2.1, & then get out of it
cd qemu-eos; git switch qemu-eos-v4.2.1; cd ..
# Important, since the v4.2.1 branch is atleast the most compatible with our compilation library we have.

# Create separate build folder next to our QEMU called `qemu-eos-build`, then go inside it
mkdir qemu-eos-build
cd qemu-eos-build

# Begin the configuration procedure with the following parameters
../qemu-eos/configure --target-list=arm-softmmu --enable-plugins --disable-docs --enable-vnc --enable-gtk

# Make with 16 threads.
# You can change how many thread you want,
# but be sure not to get too high than your computer specification.
make -j16

# Make the plugins
make plugins

# Copy the Magic Lantern library into our QEMU plugin folder
cp tests/plugin/libmagiclantern.so arm-softmmu/plugins/

# Done. you can now run the QEMU.
# go back to `qemu-eos` repository & see the help for further instruction
cd ../qemu-eos/magiclantern
./run_qemu.py --help
# you will now run QEMU with that `run_qemu.py` command above.

# Be sure to provide your own ROM you dumped from your own Canon EOS camera!
# Perkedel nor X0p1r4t3 will not provide neither accepting sparsdated Canon ROM firmware files
# due to abusive DMCA laws extradited from Earth where Canon comes from,
# unless Canon goes bankrupt & the files becomes rare & risk disappearing.
If you made some changes in this QEMU EOS, don’t forget to recompile & make sure the Magic Lantern library is still placed properly to your QEMU EOS plugin folder
make -j16 && make plugins && cp tests/plugin/libmagiclantern.so arm-softmmu/plugins/
Note however, that you may need to do cleanup (instruction below) for the best result OR if the recompilation fails.
Re-compilation
Before recompiling after either change or not or something else, make sure you have cleaned up the compilation result for the best outcome possible by doing the following:
# cleanup Magic Lantern
cd ~/sauce/simplified/magiclantern_simplified
make clean

# return home
cd

# cleanup QEMU EOS
cd ~/sauce/simplified/qemu-eos-build
make clean
Magic Lantern itself
Simple go to which platform folder you’d like & then recompile
# for example to recompile 200D firmware v1.01 again..
cd ~/sauce/simplified/magiclantern
cd platform/200D.101
make zip

# OR you can recompile all versions of ML by start
# compiling at the root of the repository instead of which platform
cd ~/sauce/simplified/magiclantern
make zip
QEMU EOS
You need to reconfigure the QEMU EOS again, then compile the QEMU & the plugins, & recopy the ML library back to QEMU plugin folder
# make sure you are still in the QEMU EOS build folder
cd ~/sauce/simplified/qemu-eos-build

# reconfigure so the compiler can see installed libraries you had right now
../qemu-eos/configure --target-list=arm-softmmu --enable-plugins --disable-docs --enable-vnc --enable-gtk

# start recompilation both the QEMU & plugins
# & recopy the ML library to the plugin folder.
make -j16 && make plugins && cp tests/plugin/libmagiclantern.so arm-softmmu/plugins/
Preparing QEMU EOS
Further informations:
- How to QEMU in Original Source code, QEMU branch
- How to QEMU in Simplified QEMU EOS repository, v4.2.1 branch
- Canon EOS 4000D / 3000D / Rebel T100 Development in ML Forum, where a1ex had attempted to emulate the camera using QEMU.
Untested
Incomplete & unconfirmed instruction
We are deeply apologize. However, instructions in this section below are still in progress.
We have compiled stuffs we could understand from many replies & articles above
Proceed at your own risk!, We are currently unable to test the step & optimize
the working condition due to a technical difficulties at the moment.
We are working on the fix.
Step 1. Dump the ROM from your Canon camera!
⚠️ Sparsdat / Piracy of active on sale Canon Firmware & Dumped ROM files are forbidden
Explanations
Perkedel nor X0p1r4t3 nor affiliates will not accept sparsdat contribution of active commercial proprietary product,
Canon Firmware & Dumped ROM files that are still on sale (or shipped from certain product) & very common.
Unless any or some of the following:
- File(s) is/are litterally gone, no longer found, poof to dust. At this point, restrictions especially ones that disallow redistribution shall be void & null.
- File(s) is/are too long overdue on a case by case basis
- File(s) is/are becomes rare these days, sought after, on a case by case basis
- File(s) is/are terminally rare & just one risk of disappearing, few to none exception on a case by case basis
- File(s) is/are too long overdue forbidden for reuploads due to a certain reasons on a case by case basis
- File(s) is/are Open Source licensed (e.g. GNU GPL series) But it costs more than $0 to get its binary. If the next version repent to $0, link the canonical download link instead & keep redistributing the old version (unless found & confirmed the version archive at any point, which then you have to link to that archive instead if you wish to link the old version.)
- File(s) is/are placed behind account login / email access wall / community guild exclusive (e.g. Discord only), even as a 69420 protection. Archivers hates login required, most of them can only do anonymous crawling! Not only that, it is egregious having to share your personal data just to get the file.
- File(s) is/are encrypted behind password separate to 3rd party link or any complicated exclusive means, even if the password reveal link(s) is/are still active. Forcing gamers to open up 3rd party link just to get the password may compromise personal data & possibly downloads other unwanted malicious softwares. This rule applies only to password that did not placed next to download link at the same page. Admiral Zumi recommends to re-zip (recompress) the folder without password for convenience, unless the topic is contextually known to cause / being in war.
- File(s) is/are set in a time bomb where at certain time it / they expires & no longer accessible or otherwise downloadable, even if the bomb still not detonated yet. Gamers shall not & NEVER be exposed to any form of FOMO (Fear of Missing Out) & create moment of envy for those who were late of acquiring the file(s). Does not apply the opposite, If the active embargo forbids any redistribution or access, wait for maximum subjective time appropriate or actual embargo finish time, then link to canonical download links instead (even if it has been reserved for later when embargo finish, please put so immediately).
- File(s) is/are linked under a complicated button function & non-obvious e.g. requires running Javascript function (embedded inside a
buttonelement & ascriptelement close by or separated regardless their complexity & obfuscation level) to lead you to download link instead of doing things like<a href='https://example.org></a>'. Most Archivers have troubles interpreting non-standard URL button, and may requires manual intervention which no archivers have. Even some of them do not properly emulate any Javascript or worse do not load its Javascript. - File(s) was/were $0 before, but by the same version it's no longer $0, whether other mirror still downloadable or not. Does not apply opposite, if the file became $0 (again or just finally), cease reuploading the new $0 file(s), and link to there instead!
- Company/Individual has a version control repository public, but upon further inspection it was just empty (does not count whether or not it has any text file such as
README&/orLICENSE), only collecting Issues; Promises to submit the entire source code later but to this day still not fulfilled on a case by case basis. At this point, all rules above become void & you must re-link the correct direct download OR reupload the correct non-suspicious files even if the product is still on sale & not rare - Company/Individual has been bankrupt, so with their copyright restrictions
- Company/Individual has been acquired by an open source company (us or somebody), miraculously, & removed every nonsense restriction as all as possible (e.g. uploading source code publicly)
- Company/Individual has egregious greeds such as subcription only
- Company/Individual downtook a precious products for an egregious reason, like an immature & snowflakes
- Company/Individual is notorious for being litiguous (such as abusing DMCA reporting system & getting the content they deem infringing down at all cost; always trying to sue all consumer they think has infringed their so-entitleful copyrights). At this point, all rules above become void & you must re-link the direct download OR reupload the actual files even if the product is still on sale & not rare
- Company/Individual is notorious for being genophobic (blocking everyone for certain likes & features, such as anti-kamatussa; blocking simply for others specification either for certain agendas or any over-exagerated sacred means; even does diligent measures to block that particular person on every platforms. At this point, all rules above become void & you must re-link the direct download OR reupload the actual files even if the product is still on sale & not rare, as well as all citizens are permitted to do their responsibilities.
- Company/Individual has placed download link / purchase page behind advertise short links (ad fly esque). At this point, all rules above become void & you must re-link the direct download OR reupload the actual files even if the product is still on sale & not rare
- Company/Individual has placed download link / purchase page behind a guild system (e.g. Discord) which often times each account has limited amount of joins without a premium or subscription to the guildverse (
Nitrofor Discord); Not to mention that some guild disallows alternate account &/or gamers does not like to create alt accounts just to complete the mission. At this point, all rules above become void & you must re-link the direct download OR reupload the actual files even if the product is still on sale & not rare - Company/Individual has packed the downloaded file (asset files, just simple single asset & plugins) in a suspicious executable binary (e.g.
Never_gonna_give_you_up-Downloader.exe). At this point, all rules above become void & you must re-link the correct direct download OR reupload the correct non-suspicious files even if the product is still on sale & not rare - Company/Individual uses / relies on a transaction system that is either, some, or all: unrecognized, untrusted, unfamiliar (neither Gumroad, Patreon, Steam, Itch, etc. anything we have already trusted, verified, & familiar with), proprietary system (even if it directly benefits legit payment API like PayPal), Manual ala dark web mafia substance purchase style; (* on a case by case basis). At this point, all rules above become void & you must re-link the correct direct download OR reupload the correct non-suspicious files even if the product is still on sale & not rare
Additionally, we will not host* any eligible to sparsdat files directly in here due to location of our hosting here on Earth. If you have any question, Please consult with Admiral Zumi or representatives at X0p1r4t3 Support Center in Dasandim.
For paywallist & proprietarist, Perkedel & X0p1r4t3 will not be responsible for any event data loss & corruption caused by either disaster or intentional.
Events like this is unfortunately a consequences from the aforementioned Company/Individual.
If any of your file(s) does / do violates any of the exception above, you will be punished not by us but also other gamers e.g. with redistribution for a particular loss or worse, as a whole.
* There may be expceptions if need be.
- Acquire the ROM Dumper. for EOS with DiG!C Between 2 through 8 (2 ≤ DIGIC ≤ 8), use a1ex’s Portable ROM Dumper.; While DiG!C more than 8 & 10 (DIGIC 8 and 10), use srsa’s technic in Canon Basic Dumper which utilizes Canon Basic
- For Portable ROM Dumper, we recommend that if available, use the matching
FIRfile provided. Choose the one that matches your model. Note that Low end / Entry Level to Advanced DSLR Cameras have different model name for specific region. Following are which model that has different names equals with:- 3000D / 4000D / Rebel T100
- 1500D / 2000D / Rebel T7 / Kiss X90
- 1300D / Rebel T6 / Kiss X80
- 1200D / Rebel T5 / Kiss X70
- 1100D / Rebel T3 / Kiss X50
- 1000D / Rebel XS / Kiss F
- 250D / Rebel SL3 / Kiss X10
- 200D / Rebel SL2 / Kiss X9
- 100D / Rebel SL1 / Kiss X7
- 850D / Rebel T8i / Kiss X10i
- 800D / Rebel T7i / Kiss X9i
- 760D / Rebel T6s / 8000D
- 750D / Rebel T6i / Kiss X8i
- 700D / Rebel T5i / Kiss X7i
- 650D / Rebel T4i / Kiss X6i
- 600D / Rebel T3i / Kiss X5
- 550D / Rebel T2i / Kiss X4
- 500D / Rebel T1i / Kiss X3
- 450D / Rebel XSi / Kiss X2
- 400D / Digital Rebel XTi / Kiss Digital X
- 350D / Digital Rebel XT / Kiss Digital N
- 300D / Digital Rebel / Kiss Digital
- 77D / 9000D (JP)
- Fun Fictional Fact: Dasandim follows whatever Indonesian model name gets
- Get the SD Card. It must be formated within regular FAT series (FAT 12, 16, or 32). exFAT won’t work.
- if you chose just
autoexec.binmethod, you must make the SD Card bootable, using Pelican’s EOScard utility OR petabyt’s ML Installer (There isCardtab that also lets you modify the bootflag of the SD card). - It is recommended to just stick with
FIRmethod instead.- Simply place the ROM Dumper firmware at the root of the SD Card,
- No need to make it bootable,
- Insert the SD card into the camera & close the card / battery door. Wait until the card successfully read looking at the LED.
- Turn on & Run firmware update. The file will dump the firmware of your camera. You should see up to 4 ROM files. 2 are both the ROM files & rest 2 are each MD5
- Successful dump should roughly looks something like this, on the following forum thread replies. Today’s dumper may looks different, but most importantly ensure there is no fatal error.
- IMPORTANT!!! Always check both ROM files MD5 checksum after successful dump. Save both MD5 checksum result somewhere safe.
- Windows MD5 checksum software is available using https://www.winmd5.com/
- Linux & macOS should have a program called
md5sum(you may have this already pre-installed, or you can search upmd5sumin yoursynapticorpacman). simply typemd5sum -C *.MD5to check all MD5 present.
- You may need to repeat above MD5 test on the same card, then on another card & ensure the MD5 are pretty much similar.
- Sometimes, Some camera only has ROM1 connected, hence ROM0 contains just random noise which will may results in ROM0’s MD5 mismatch. This is normal.
- Safe all ROMs & MD5s in a confidential place, DO NOT SHARE ANY OF THE ROM PUBLICLY (even if you live in X0p1r4t3 city), as you are holding extremely proprietary Canon softwares. Remember, Earth DMCA agencies extradites across galaxies, and they have Dasandim pinpoints!
Step 2. Insert the ROMs into the emulator!
According to run_qemu.py in your Simplified QEMU EOS, by default ROMs will be placed in the roms folder located next qemu-eos & qemu-eos-build.
joelwindows7@JOEL-ROG-GL503GE:~/sauce/simplified/qemu-eos/magiclantern$ ls
build_qemu_direct.py  cam_config   docker_builder  ml_tests   run_qemu.py
build_qemu_docker.py  disk_images  ml_qemu         README.md  run_tests.py
joelwindows7@JOEL-ROG-GL503GE:~/sauce/simplified/qemu-eos/magiclantern$ ./run_qemu.py --help
usage: run_qemu.py [-h] [-q QEMU_BUILD_DIR] [-r ROM_DIR] [-s SOURCE_DIR] [--boot] [--gdb] [-d [D_ARGS ...]]
                   {1000D,100D,1100D,1200D,1300D,200D,400D,40D,450D,500D,50D,550D,5D,5D2,5D3,5D3eeko,5D4,5D4AE,600D,60D,650D,6D,6D2,700D,70D,750D,760D,77D,7D,7D2,7D2S,800D,80D,850D,A1100,EOSM,EOSM10,EOSM2,EOSM3,EOSM5,EOSRP,M50,R}

Script to run Qemu with EOS support.

positional arguments:
  {1000D,100D,1100D,1200D,1300D,200D,400D,40D,450D,500D,50D,550D,5D,5D2,5D3,5D3eeko,5D4,5D4AE,600D,60D,650D,6D,6D2,700D,70D,750D,760D,77D,7D,7D2,7D2S,800D,80D,850D,A1100,EOSM,EOSM10,EOSM2,EOSM3,EOSM5,EOSRP,M50,R}
                        Name of model to emulate, required

optional arguments:
  -h, --help            show this help message and exit
  -q QEMU_BUILD_DIR, --qemu-build-dir QEMU_BUILD_DIR
                        build dir for ML Qemu, default: /home/joelwindows7/sauce/simplified/qemu-eos-build
  -r ROM_DIR, --rom-dir ROM_DIR
                        location of roms, default: /home/joelwindows7/sauce/simplified/roms
  -s SOURCE_DIR, --source-dir SOURCE_DIR
                        location of Magic Lantern repo, used to find stubs etc for emulation. Default:
                        /home/joelwindows7/sauce/simplified/magiclantern_simplified
  --boot                attempt to run autoexec.bin from card (set cam bootflag), default: False
  --gdb                 start Qemu suspended, until gdb connects on port 1234
  -d [D_ARGS ...], --d-args [D_ARGS ...]
                        space separated list of qemu '-d' arguments. See help for qemu for complete list
say that in your working folder looks something like this:
joelwindows7@JOEL-ROG-GL503GE:~/sauce/simplified$ ls
magiclantern_simplified  qemu-eos  qemu-eos-build
Therefore, you’ll need to create a directory called roms by typing mkdir roms. do make sure that folder is placed among your Magic Lantern workspace, NOT inside any of the source code folder.
joelwindows7@JOEL-ROG-GL503GE:~/sauce/simplified$ mkdir roms
joelwindows7@JOEL-ROG-GL503GE:~/sauce/simplified$ ls
magiclantern_simplified  qemu-eos  qemu-eos-build  roms
However, you can change where the rom folder would be loaded at with -r ROM_DIR or --rom-dir ROM_DIR where ROM_DIR (when going to execute run_qemu.py) if folder you choose where both of your ROM located at.
Copy the ROM files you just saved into that new roms folder or whereever you would later choose with -r argument. We recommend that you leave the setting at its default for now.
Step 3. (Optional, perhaps needed) Apply patch into the ROM files.
- For some models, you may need to apply some few patches. e.g. in a1ex attempt, he did applied the patch for the EOS 4000D / 3000D / Rebel T100 emulation.
# Go into the `roms` folder
cd ~/sauce/simplified/roms

# write the BOOT.BIN from ROM1.BIN & then overwrite part of the ROM1 with stuffs from BOOT.BIN just there.
dd if=ROM1.BIN of=BOOT.BIN bs=64k skip=1 count=1
dd if=BOOT.BIN of=ROM1.BIN bs=64k seek=511
- Additionally, ROM0 may not be needed anymore, such as above with 3000D.
Additional Notes for 3000D: Will add to simplified later.
- change flash model ID to 0x003825C2 (1300D has 0x003925C2) (in the Stubs)
- CURRENT_TASK 0x2F53C (in the Stubs)
- 0xFE1171B4 DebugMsg (in the EOS C code)
- 0x3888 task_create (in the EOS C code)
Step 4. Run the emulation
Once done, you can run the emulation.
# Make sure you're in the QEMU-EOS Magic Lantern folder
cd ~/sauce/simplified/qemu-eos/magiclantern

# Attempt to run this
#./run_qemu YOUR_MODEL_ACCORDING_TO_HELP
# You must replace `YOUR_MODEL_ACCORDING_TO_HELP` (required) with available
# models in the run qemu help. say your model is 1000D & you had both of the ROMs, so
./run_qemu 1000D

# & if you had different ROMs in another folder, you can have that too
./run_qemu -r ~/sauce/simplified/roms/200D 200D
# the model name shall be placed the last as
# that argument in the python script was programmed like that, to be positional.
# note once again, you may need to have magiclantern_simplified cloned too as well.
Enjoy.
Installation
Notes
For the impatient: just follow the quick install guide from the
download page.
For a more thorough description of the install process, including what to do when things go wrong, keep reading.
Before installing Magic Lantern you need to:
- Know how to use a computer (how to download a file, how to unzip an archive, how to browse the web and read the forum…)
- Use your camera without ML for a few months. When you are confortable with Canon firmware, consider installing Magic Lantern.
- Do your research. There is a lot of information available on this site. Read the user guide, the FAQ, and browse the forum.
- Be patient. Magic Lantern can overwhelm with the amount of functions added. But it is actually very easy to use once you know the basics.
Caution & VERY IMPORTANT!!!
Read Carefully
May possibly damage your camera, Read instruction real carefully!
)
- Read the entire guide before performing any steps.
- You are responsible for any damage done to your camera.
- Never delete the Magic Lantern files from the card! Format the card instead.
- After opening the card door, always wait for LED confirmation (or for 5 seconds) before removing the card, even if your camera is turned off!!!
- Additionally for NEW INSTALL, there is a bug regarding to libUSB which workaround is available according to This petabyt's thread reply
Right after opening the card door, Canon firmware accesses the card without turning on the LED (yes, with the main switch turned off). If you remove the card too early, the camera will freeze and will drain the battery, or even cause permanent damage! You will be running random code (remember you are loading executable code from the card), and we can't do anything about it without reflashing Canon firmware with our own code.
Get the right firmware version
- Go to https://builds.magiclantern.fm/ and download the Magic Lantern zip file for your camera
- Make sure you are running the right Canon firmware version, specified on the download page. Links to matching Canon firmware files are included in
InstallationandUseful Links. - You can check your firmware version by setting your mode dial to
M(Manual) and looking in the Canon menu. - Nothing bad will happen if you try to run ML on a different firmware version. Magic Lantern checks firmware version before attempting to run. If there is a mismatch you will get an error message screen and you have to pull the battery to proceed. With older (outdated) Magic Lantern versions you will get a blinking LED instead. You still have to pull the battery.
Steps:
NEW INSTALL (Work in Progress)
as in:
This NEWER Install Instruction
Please check this guide above for up to date instruction. Instructions will be syndicated here for redundancy, in event of disaster.
Compatible for:
Newer ML ports & relatively new camera
- 1300D / Kiss X80 / Rebel T6
- 4000D / 3000D / Rebel T100 For other models, please refer to Current Install section bellow.
Install
- Connect the camera to a Windows 7/10 or Linux computer with a USB cable.
- Download mlinstall (https://github.com/petabyt/mlinstall).
- On Windows, extract the files and run the EXE. On Linux, you’ll need to set the
.AppImagefile as executable. Here’s a quick tutorial: https://discourse.appimage.org/t/how-to-run-an-appimage/80 Here I click `Get Device Info“ to see if it can detect the device.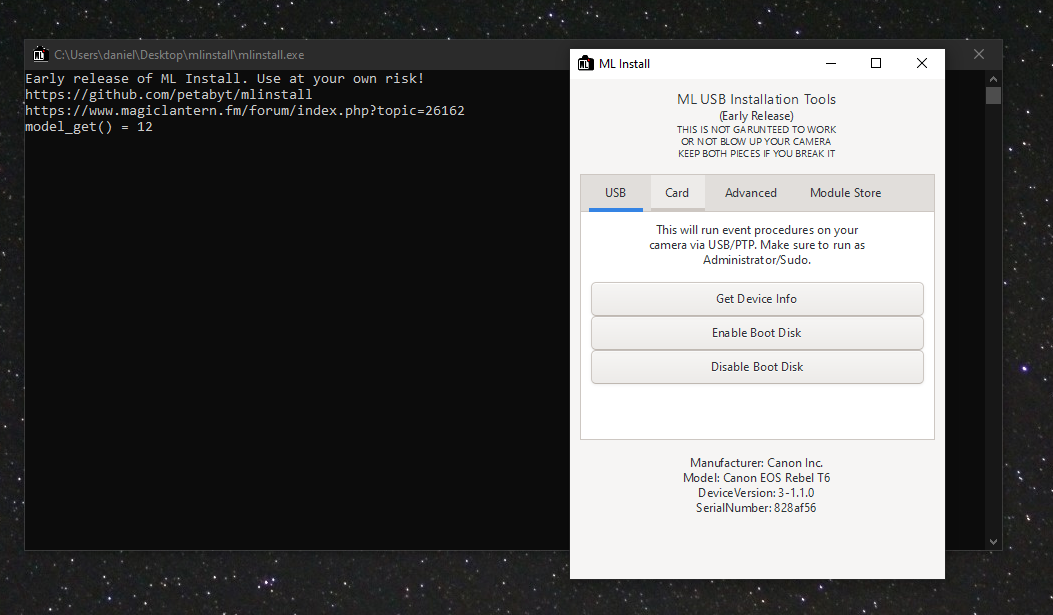
Fig. 1 - Result of Clicked Get Device Info
On first run on Windows, it should not work. Here’s what to do:
- DO NOT USE ZADIG for now! IT’S SLOW & DESTRUCTIVE!! use mcuee’s libUSB instead! Learn more in petabyt’s reply
- (Backup)
Download and runZadig. - (Backup)
On the Canon Camera device, replaceWinUSBwithlibusb-win32as in this GIF: https://github.com/petabyt/mlinstall/blob/master/assets/zadig.gif - (Backup) In order to revert this change, simply repeat the steps and choose
WinUSBinstead oflibusb-win32. Some Windows software may fail to work if this change is not reverted. - (Backup) Once you have verified that USB communication is working, click
Enable Boot Disk. - (Backup) In order to revert the camera to factory settings, click
Disable Boot Disk.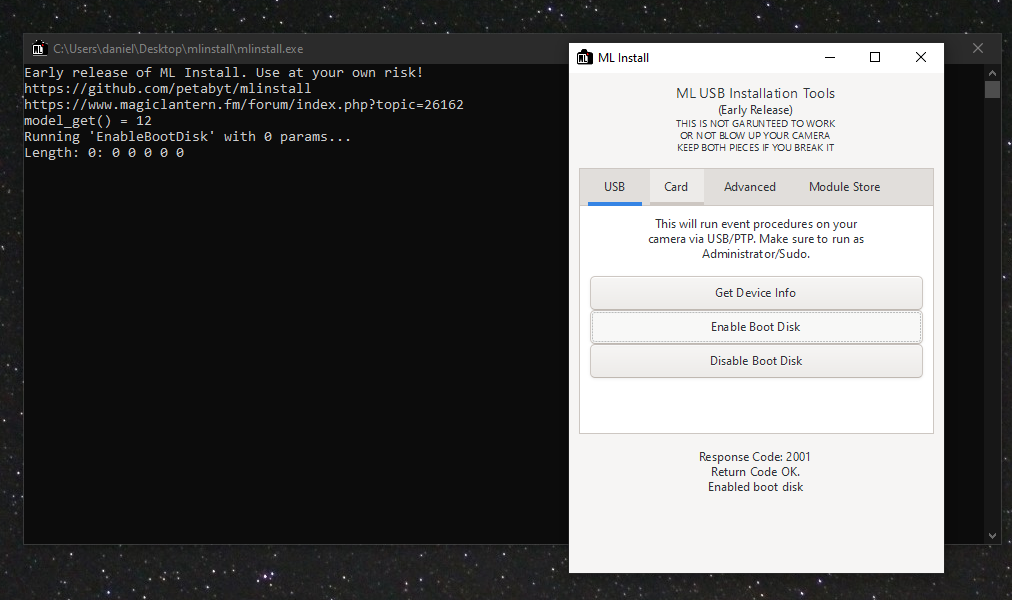
Fig. 2 - Enabling Bootdisk to the camera - Unplug the camera SD card from the camera.
- Insert the camera SD card into your computer. You might need an adapter.
- Ensure that your SD card is named
EOS_DIGITAL. mlinstall searches for a storage device namedEOS_DIGITALand writes to the first one it finds. - In mlinstall, navigate to the
Cardtab and clickWrite card boot flags. This will write data to the SD card. It’s a good idea to format the card in the camera first. - In Linux, eject / unmount the card before removing it. Usually in your file manager left sidebar, you should see (Eject) Button next to
EOS_DIGITALmedia. Click the eject button to unmount the SD Card.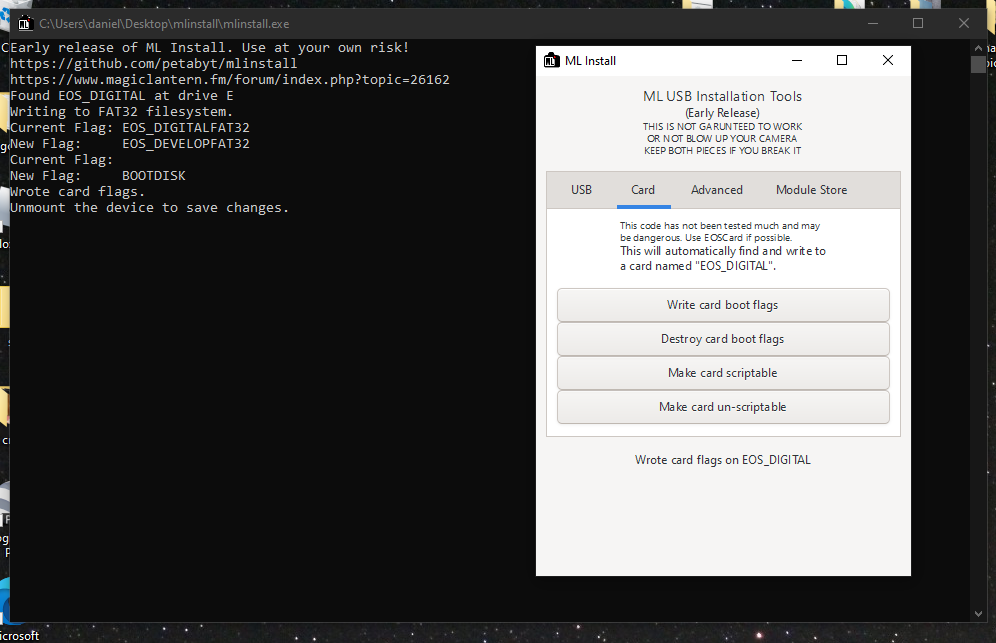
Fig. 3 - Enabled Bootflag to the SD Card - Once you have written the card flags, you will need to download a build for your camera. Make sure that the model ID and firmware version of your camera matches the build. (you can check it in the Canon menu). You might need to downgrade or upgrade.
- Extract the Magic Lantern release zip file contents onto the SD card. Make sure that
autoexec.binand theMLfolder are at the top directory, alongsideDCIM. Fig. 4 - Basic folder structure of installed Magic Lantern in the SD Card - Insert SD Card into camera and turn it on. On first startup,
ROM1andROM0will be backed up. In the picture settings screen inM(Manual) mode, press theQ/Avbutton (or DELETE/TRASHbutton).
Uninstalling Magic Lantern
- Format the card (and back up any data first!)
- Run mlinstall again and click
Disable Boot Disk.
Note that mlinstall has a
Destroy Card Boot Flagsfeature that can make the SD Card non-bootable. (revert it to normal setting) After you run it, you will not need to format your card.
Troubleshooting
1300D / Kiss X80 / Rebel T6
You may either have to downgrade or upgrade your firmware to a specific version. Here are some guides showing how to downgrade your firmware:
- https://magiclantern.fm/forum/index.php?topic=18941.0
- https://www.magiclantern.fm/forum/index.php?topic=24926.0 A firmware file archive can be found here:
- https://pel.hu/eoscard/
ccritix / critix: “Try to do a firmware update to version 1.1.0. (even if you have exactly this version on your device). Then you can try to test ML. This problem seems to exist on many devices. I suffered the same with my device. After an “update” to version 1.1.0, I was able to work on ML.”
CURRENT INSTALL
as in: This Install Instruction Please check this guide above for up to date instruction. Instructions will be syndicated here for redundancy, in event of disaster.
Compatible for:
Any older cameras & cameras not listed on the New install above.
First install guide
Step 1. Preparing your camera
- Use a fully charged Canon battery (original, NOT third party);
- Remove any accessories from your camera (such as battery grip or external flash);
- Make sure you have a card reader.
- Double-check your Canon firmware version.
- Rotate your mode dial to
M(Manual) position - Recommended: Restore your camera to default settings (
Clear settings, see picture in the Big red warning above). Remember this will reset all canon settings and removes custom picture styles!
Step 2. Installation
)
- Format the card in the camera (low-level format).
- Unzip all of the files from Magic Lantern zip archive to the root of your card.
- Launch the
Firmware Updateprocess from the Canon menu and follow the messages on the screen. - Once you see the green confirmation screen, restart your camera. Done.
- If anything goes wrong, check the Troubleshooting section below.
Step 3. Magic Lantern first startup
- Go to Canon menus and restore your preferences. Don’t forget these:
- On 550D/60D/600D, enable manual video exposure.
- On 5D Mark II and 50D, enable LiveView shooting (a button right beside of your viewfinder cup).
- You may also have to re-install your custom picture styles
- In LiveView, toggle the
INFO/DISPbutton (usually north-west or up-right next to D-pad) until you see the Magic Lantern audio levels and footer bar. - Press the
DELETE/TRASHbutton to open ML menu andREAD THE HELP TEXTthat pops up. - Read the User Guide and start using Magic Lantern.
- Don’t forget to wait for LED confirmation before removing the card! (unless you use a 550D)
Installing Magic Lantern on other cards
)
- Simply repeat Step 2 above on every card you would like to use Magic Lantern.
- If you prefer to skip the firmware update step and prepare your cards from the PC, you may copy ML files on your card and make it bootable with a special utility: EOScard for Windows, MacBoot for macOS, or make_bootable.sh for macOS/Linux in command line.
This table below explains where magic strings must be written depending on Filesystem type & version (done by tools above):
| FAT version | Volume Label = EOS_DEVELOP | Bootcode+2 = BOOTDISK | SCRIPT |
|---|---|---|---|
| FAT12/16 | 0x2b / 43 | 0x40 / 64 | 0x1f0 |
| FAT32 | 0x47 / 71 | 0x5c / 92 | 0x1f0 |
| ExFAT | 0x82 / 130 | 0x7a / 122 | 0x1f0 |
| BtrFS (unsupported) | 0x??? / ??? | 0x??? / ??? | 0x??? |
| ext3 (unsupported) | 0x??? / ??? | 0x??? / ??? | 0x??? |
| ext4 (unsupported) | 0x??? / ??? | 0x??? / ??? | 0x??? |
VBR checksums must be updated for ExFat
SCRIPT is for Canon basic.
Updating Magic Lantern
- Simply delete your old Magic Lantern files from your card and copy the new ones.
- You can keep your configuration files (the ML/SETTINGS directory from your card).
Uninstalling Magic Lantern
DO NOT just delete the Magic Lantern files from the card!
If you do, the camera will freeze at startup and you'll have to take the battery out.
Please follow below instruction on how to properly uninstall Magic Lantern!
Uninstalling ML from one card
- Format that card from the camera (select this option: Format card, remove Magic Lantern) and reboot. Your camera will load the original firmware when you use that card.
Uninstalling ML from the camera
- With a Magic Lantern card, launch the
Firmware Updateprocess and follow the instructions on-screen. - Re-installing Canon firmware will not remove Magic Lantern.
Troubleshooting
- If the card LED blinks continuously AND the camera is unresponsive, please report an issue (to Emergency Camera Brick section) and show them the LED blinking sequence (a short video will do, Recommended using Odysee (Invite link) or YouTube (burner Gmail is okay)). In older versions, this used to mean “
wrong firmware version”, but new builds are now able to show a message on the screen, regardless of your Canon firmware version. - If you have a different Canon firmware version, please use the one from our download page (select camera, scroll to Installation).
- If the screen does not turn on, but autofocus works, remove the battery and format the card. This happens when the card is bootable, but autoexec.bin is not there.
- Check if all doors are closed. The camera will not boot if any of the card or battery doors are open !
- If the camera does not boot (seems dead), remove the battery and the card. Then put the battery back and try to boot the camera without card. Then put a formatted card in the camera and try to boot without Magic Lantern. Only after you are sure the camera is OK, you can try to see what’s wrong with Magic Lantern.
- If the camera asks for a firmware update, place Canon firmware on the card (this was a problem in older versions).
- DO NOT use a bootable card without a working autoexec.bin on it! If you do, remove the battery immediately, switching the camera off is not enough !!!
- Check the issue tracker (both Original Source code & Simplified) for similar problems; if you can’t find the solution, create a new issue there according to your ML edition (e.g. 200D compiles from Simplified, so create issue in simplified; others go to original source code).
- If you get “
ML directory not found! Please copy all ML files.” during installation → FAQ.
Important notes
- After opening the card door, always wait for LED confirmation (or for 5 seconds) before removing the card!!!
- Early generation EyeFi cards may not work; other WiFi cards may work properly.
- SD-to-CF adapters are not supported!
- If you have a bootable card and have the
BOOTDISKflag set in the camera (which the installer does), and you do not have anAUTOEXEC.BINfile on the card, the camera WILL NOT BOOT! It will hang and not wake up until the battery is removed. - If you encounter a “locked up” camera, quickly remove the battery.
- When in doubt, remove the battery and reboot.
- And, remember that this software can damage or destroy your camera. Perkedel nor Magic Lantern will be responsible for damages due to either negligence, careless, and/or unforseen disaster / force majeur
Further steps
You may wanted to learn the following stuffs if you’d like to go further & perhaps contribute:
C. A programming language. Core of everything and used to program things like an Operating system, including Linux kernel, Embedded devices, etc. Many programming languages takes inspiration fromC’s syntax.Ghidra. A Software Reverse Engineering framework built by researchers at National Security Agency in USA, Earth. Used to dissasemble binary files & allows deep analysis upon. You can use this to dissasemble Canon ROM files for let’s say to find component addresses & help you build stubs.
Credits
Stuffs
- ccritix’s 3000D Platform folder Complete with Stubs. Lacks the Installation folder atm. OR try using libUSB method?
- names_are_hard’s how to QEMU in Magic Lantern Simplified
eos.cin ccritix Notice the4000Ddefinition! Ctrl + F and take a look for4000DFlash ID & stuffs.eos.cin names_are_hard No 4000D definition, but1300Ddefinition! Ctrl + F that too, it’s in Enumeration. I gotta bring this4000Din!- https://github.com/reticulatedpines/qemu-eos/tree/qemu-eos-v4.2.1/magiclantern
End
by JOELwindows7
Perkedel Technologies
CC4.0-BY-SA